• Home
  • Courses
  • Articles
  • Member

Permaculture Reflections

Learn sustainable design

Swale Calculator

‘Water’ Articles at Permaculture Reflections

September 2, 2015 by Douglas Barnes 27 Comments


Update: The Mark III Swale Calculator is here!

Swale Calculator

   Input numbers only.

Desired number of swales:


Distance from bottom to top of hill (m):

Volume of rainfall in a large event (mm):

Length of swale (m):

NOTE: No slopes over 20º for safety and efficacy.

Estimated slope above swale in degrees:

Select estimated percent of runoff:


   (See table below for runoff guide.)


   Results


Video tutorial:


Surface Percentage of runoff
   Paving, roofs, hard surfaces 85 to 95%
Hardpan 50 to 70%
Bare earth 20 to 75%
Grass 10 to 25%


Welcome to the Mark III online permaculture swale spacing calculator. Swale spacing has been a perennial question in permaculture. This calculator creates a template for swale placement based on a logarithmic distribution. It is based on the fact that groundwater flows downward, leaving the top half of hills drier than the bottom. The idea is that water collection should be more intensive at the top of a hill, and be progressively less as you move down the hill.

Why calculate spacing?

Installing swales costs time, energy, and money. Over-installation of swales is a waste of resources. Under-installation is a missed opportunity. If you want to have an optimal system, you’ll need to calculate spacing. The good news is that now it’s easy with our calculator!

How to use this calculator

  1. You will need to measure the hill from the bottom to the top (or from the bottom accessible boundary to the top accessible boundary, if you hit either physical boundaries or property boundaries). This figure will need to be in metres for the calculator. You can convert units using Google. If you are using an aerial map and are only using the horizontal distance from the bird’s-eye perspective, you will need to convert this to the on-the-ground distance (i.e. the hypotenuse) using trigonometry. (Distance on ground = x ÷ cos Θ where x is the horizontal distance, and Θ is the slope of the hill in degrees.)
  2. Check the local weather records to see how much rain you can expect in a single large rainfall.
  3. Input the length of the swale you will build.
  4. Estimate the slope of the land above the swale in degrees. A mobile app such as Theodolite HD can help here.
  5. Estimate the percentage of runoff on the site. Use the table above to help you. [Note: If it’s 0%, you can only dig circular swales.]
  6. Keep in mind that because contour lines are not parallel, the swale spacing will not be uniform across the entire length of the swales. This calculator gives you the best approximation. I do have the the Mark IV in the concept stage, which will address this issue.
  7. The calculator will return each swale’s location form the bottom of the hill, the volume of each swale, and the cross-sectional area of the swale, which you can use to plan the size of the swale.
  8. Cross-sectional area in m2
  9. Because of the assumptions built into this calculator, you will need to determine if the volume and cross-sectional area of the top swale is correct or not. You will need to know the catchment area above your swale, and make sure it is big enough to hold all the runoff it will receive.

How spacing works

This calculator assumes you want to capture the maximum amount of water available on a site. There are plenty of times where you will not want to do this. Make sure you know whether swales are going to be helpful or harmful. See An Introduction to Swales and When Swales Can Kill for more information.

Remember that the figures given by the calculator are a guide. There will be an inherent margin of error. Spacing is based off the assumptions that your contour lines are going to be roughly parallel (they won’t be in the real world), and that your catchment area is going to be rectangular in shape (or at least an area with parallel edges). In practice, you might face an irregularly shaped catchment area. The calculator can still serve as a rough guide for you in these instances.

Designing your swale layout

With implementation of earthworks, it is ideal to start at the top and work your way downhill. When designing your plan with this calculator, the figures given (Swale 1, Swale 2, Swale 3, etc.) are from the bottom of the hill to the top. In other words, the first distance for Swale 1 is measured from the bottom of your hill.

Catchment areaSpacingFirst swaleSecond swaleThird swaleFourth swale


Spacing is determined by a logarithmic distribution from bottom to top. This will result in larger, wider spaced swales at the bottom, and closer, smaller swales at the top.

This arrangement makes the most sense in terms of encouraging water infiltration. The water table will drain downward, leaving the top drier. A greater number of swales at the top will allow more water to infiltrate there.

Limitations of the calculator

The question of swale spacing has been an ongoing puzzle in permaculture. A few years ago, it seemed like we had an answer. In Brad Lancaster’s excellent book Rainwater Harvesting for Drylands and Beyond, there is a formula for spacing which in turn cites The Handbook of Hydrology, edited by David Maidment. Unfortunately, the spacing formula isn’t designed to maximize water collection. It gives unit swale volume divided by unit runoff. The problem here is the formula does not take into account the catchment size for the swale. It could have you putting undersized swales at intervals that are not based on the amount of water they will receive. (Testing with the first iteration of this calculator showed this flaw early on.)

The first publicly available online calculator (the Mark II) based spacing on the volume of the swales you built. The problem here is that it did not tell users how to distribute swales across the landscape. This new version provides you will spacing, volume, and cross-sectional area with the minimal amount of input data. That is to say, it does a better job of telling you what to do.

This calculator could be a lot more complicated than it is. It is meant to serve as a good guide to swale design so that you can effectively catch the available runoff without overkill (i.e. without spending more time, money, and effort than you need to spend). It simplifies infiltration rates as a function of runoff. Also, it does not account for hydraulic conductivity (saturated or otherwise),  depth to a restrictive layer, and so on. At the end of the day, we are digging a ditch on contour, not launching a spacecraft. Hyper-precision will be a waste of time. It also errs on the side of caution. The volume of your swales at the end does not account for infiltration. This will build some resiliency into your swales. They are better being a little too big than too small.

Behind the scenes

If you want to know what’s going on inside the calculator (and hopefully spot any glaring errors, if there are any), here’s how it works.

  • Spacing is determined using log(n+2), where n is the number of swales you select. For a case with 5 swales on a site (i.e. n = 5), we get the distribution shown in the diagram below.
  • Swale spacing diagram showing logarithmic distribution.

  • The runoff above every swale but the top one will be given by the formula: Runoff Volume (litres) = C • ACatchment (m2) • Vrain (mm), where C = Coefficient of Runoff (which is percent runoff ÷ 100), ACatchment is the area of the catchment in m2, Vrain is the volume of a large rain event in mm, and the ACatchment is the Swale Length in metres • Distance to uphill swale in metres.
  • Vswale = Runoff Volume
  • And Area of swale = Vswale ÷ (Length of swale • 1000). The division by 1000 here is to get us back in the correct units.

This is version 2.0 of this calculator. (But Mark III sounds cooler.)

Swales in AP, India.


We’ve got many courses currently in the works and updates to the site, including this page, coming. If you would like to be notified of our updates and courses, subscribe to our mailing list.


Filed Under: Article Tagged With: earthworks, Water

An Introduction to Swales

‘Water’ Articles at Permaculture Reflections

July 20, 2015 by Douglas Barnes 3 Comments

begin=”0s” repeatCount=”indefinite” fill=”remove”/>

What are swales?

Water-harvesting swale

Simply put, swales are ditches dug on contour. Being level, they are not designed to transport water from one place to another. Rather, their intention is to allow water to soak into the ground.

The term “swale” is a little confusing, as it is used in landscape architecture to describe a grassy ditch designed to gently drain water from an area. In permaculture, however, the term means a level water-harvesting ditch.

Why are swales used?

Swales stop runoff, allowing water to sink into the ground. The effect generally raises the water table. This makes them useful in supporting trees, and as part of a broader water-catchment strategy for a site. It should be noted, though, that many fruit trees do poorly in areas with a high water table. You will have to consider where you are installing swales, and to what end.

Where are swales used?

Swales can be used on sites with slopes from 0º up to 20º. Even seemingly flat sites can have circular swales used to capture water. On slopes greater than 20º, it is not only unsafe for most machinery used to dig swales, the volume of earth moved versus the volume of the swale makes swale construction inefficient. A smaller volume swale has a smaller catchment area, requiring more frequent spacing of swales. (See the graphic below and the Swale Calculator for more.)

Click “Animate” on the graphic below to see the effect of slope on volume.

Animate

Note that as the slope increases, the volume of the swale decreases.

Where not to use swales

Firstly, swales are aimed at supporting trees and raising the water table. If you want irrigation for a vegetable garden, swales are not the way to do this. In many, if not most cases, the water captured by swales would penetrate too low to benefit garden crops. Additionally, most garden crops will not tolerate the water table within 30 cm (1 foot) of the surface for more than 24 hours. This is why farmers are willing to spend tens of thousands of dollars on carefully engineered drainage systems. Too much water is as bad as too little.

Secondly, there are situations in which swales can cause damage to property or even loss of life! As always, you will have to design with safety in mind. For more on this topic, see the article “When Swales Can Kill.”

Filed Under: Article Tagged With: earthworks, Water

Water, Water, Nowhere

‘Water’ Articles at Permaculture Reflections

September 3, 2012 by Douglas Barnes Leave a Comment

What a summer! Hot and dry, followed by hot and dry periods, interspersed with the promise of thunderstorms that bring furious, desiccating winds, and nothing else.

For a few reasons, there has been little activity on this site until this month. A large part of the reason for this is that I have been building a passive solar home by myself (big hat tip to my wife who helped hoist heavy things and who passed me tools at many critical moments).

Last summer we had a trench dug to hook us up with electrical power. While the backhoe was here, I got my earthmover to get a chinampa started. At that time, the water table was much higher, and when we dug deep enough, it was like a water main was burst. Water gushed into the chinampa.

But then we had a relatively dry winter with next to no spring run off. This turned into a rather dry May, which became a dry June, which became a parched July, followed by an arid August. Just a couple minutes walk from my door there are poplar trees in the ditch (those wet channels that run alongside roads) that are dead and dying from lack of water.

I had planned an earthworks seminar at our farm for July, but an inability to track down the equipment needed in time (namely a subsoiler) led me to cancel it for this year (sorry to all the folks who inquired). This is very unfortunate because we really could have used all the help we could get this summer.

The back end is the bottom of a ditch that holds water during wetter years. This year the water dried right to the bottom of the chinampa, about 130 cm down below the bottom of the ditch.

The water level in the chinampa grew lower and lower until all the water in one dried up, taking all the fish with it. Another one was down to a little wallow with a few surviving minnows and tadpoles. I dug a water hole in that one and gave the minnows and tadpoles a second chance, but without rain soon, that little hole will dry up, too.

Clearly, I will have to start putting into action some of the techniques I used in the more arid India. I am shocked at how bad things have gotten in one year. Mature trees are turning colours (some as early as July) because of the lack of rain, while temperatures remain about 3 to 5C higher than normal. If there has been one upside, it is that the lack of water has meant a lack of mosquitoes. But there is a lack of more other things, too. Dragon flies and damsel flies are missing in action, as are most of the other insects you would expect to see.

Happily, our garden has done rather well. Our beds are either hugelkultur beds, or heavily mulched beds, so when we water them, they stay moist for a long time. But the pasture looks rather disastrous. Lots of farmers in the area have had to cull herds due to a lack of hay, and the large round bales are selling as much as $45 higher than normal.

Doom and gloom. But what about answers?

Answers there are! There are subsoilers around, or so goes the rumour. Hitting our pasture with an intelligently applied subsoiler will allow more infiltration. It will also capture more of the snow melt that otherwise runs off the land. We can place swales across the pastures to allow more water to sink in, too. Planting up some pioneering trees will help with soil building, which will help with water retention, as well.

It seems the devastating droughts that climate modellers have been warning might have slipped over from future possibility to present reality. It’s time to start getting greedy with the water that hits this site.

Filed Under: Article Tagged With: Water

Greywater Guidelines

‘Water’ Articles at Permaculture Reflections

November 18, 2008 by Douglas Barnes 17 Comments

The guidelines in this article are based on Art Ludwig’s industry-leading work. For further information on greywater systems, please refer to Ludwig’s Create an Oasis with Greywater, Branched Drain Greywater Systems, and Builder’s Greywater Guide. These are the best publications available regarding the construction of greywater systems.

Conservation of water is rightfully a growing concern throughout the world. Less than 2.6% of the water on the planet is freshwater. Of that, about 69.6% is locked away in ice and another 30.1% in groundwater, including 13.5% in deep groundwater reserves over 800 metres underground. Only 0.6% of the world’s freshwater is immediately available on the surface via lakes and rivers; and only 0.037% is in the atmosphere at any one time.

Industrial activity and industrial agriculture consume large amounts of the water that is available. And predictions for continental inlands forecast that global warming will bring drier conditions than those that currently exist. Of the total land mass of the Earth, 47.2% is arid, much of that converted to desert by human activity with a further 25% of the land at risk of desertification. And this problem is not limited to poor nations. While 66% of African lands suffer from desertification, 40% of the pastureland in Texas is now too arid for use. And pivot irrigation is turning patches of land on the Great Plains of North America into salted desert in 3 to 4 years. Even former patches of the Amazon rainforest are very close to becoming desert. Global water consumption is rising so fast that by 2025 demand will surpass availability by 56%. We need to shift to sustainable water usage, or we risk creating a planet largely comprised of desert.

One way to use water more efficiently, and return it to the environment clean is by greywater systems. Greywater is waste water from homes from sources excluding toilets. It is water from sinks and drains containing small amounts of nutrient-rich organic matter. Household waste water typically consists of 50 to 80% greywater. To flush this into a sewage system is a waste of life’s most precious resource.

Irrigation by spraying is very inefficient with up to 80% of the water evaporating. This has lead to severe salinisation and desertification in some areas. Greywater drained into mulch or leach pits, on the other hand, has almost no evaporation and results in about 40% of the water being taken up directly by plants (the remainder is filtered by soil microbes before tickling down to recharge groundwater systems).

Advantages

Urban households can save the energy used to purify municipal water by not using tap water for watering plants. Rural households using pumps can reduce their energy and material needs by using greywater over well water for watering.

Utilising greywater also extends the life of septic systems or reduces the load on municipal sewage treatment plants. And in areas where septic tanks are less practical, such as clayey soils and rocky areas where septic fluids cannot trickle into the ground, greywater can help tackle waste water issues.

The use of greywater helps to recharge groundwater.

Good systems are cheap to build. (More expensive systems usually perform poorly.)

Potential Problems

Greywater systems need a certain amount of space. Not every site has enough land for the water generated from the home. Partial sites from only one part (one sink, for example) may be all that can be tapped for a greywater site.

Very wet areas may become saturated with water. Such situations may be impractical or may require a different approach, such as greywater wetlands.

Cold climates make outdoor greywater systems possible through the warm season only.

Reduced water flow from a household can create a problem in urban areas with a municipal sewage system. It may be that the reduction in water flow through the pipes means that there is not enough flow to move toilet solids into the sewage main line.

ValveMany building codes have a lot of catching up to do when it comes to greywater. A system can be built with a diverter to the currently approved (i.e. unsustainable) system. The diverter can then be used to flow water into the greywater system once the code changes. This system can also be used to deal with freezing conditions mentioned above.

Arid regions need carefully managed systems due to their inherent problems with salinity. Proper choice of detergents is important for every system but becomes vital in arid regions. It is a good idea to incorporate rainwater harvesting systems with greywater, particularly laundry greywater. First-flush and/or tank overflow can be connected to greywater drains to wash away excess salts.

Design Considerations

Root crop
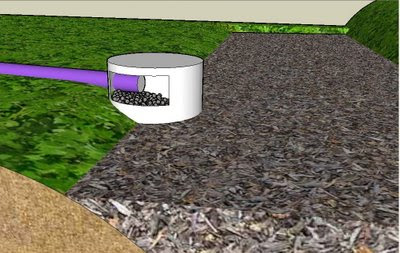
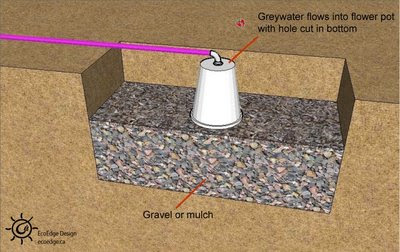
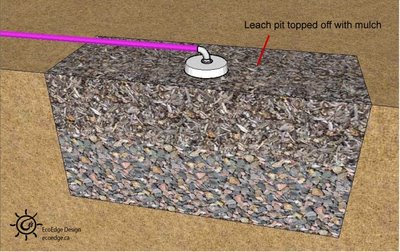
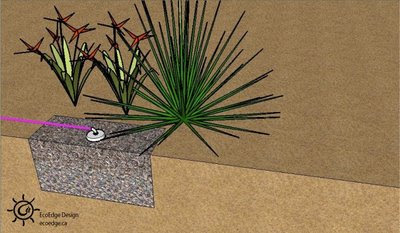
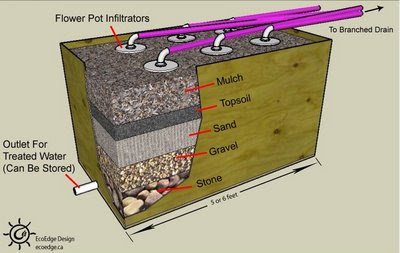
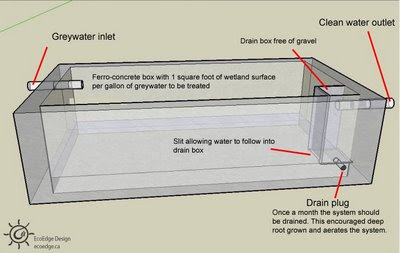
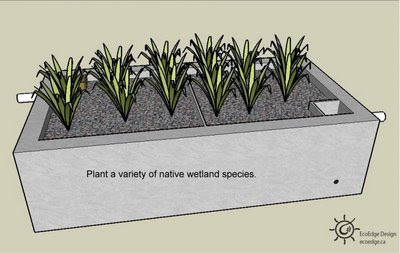
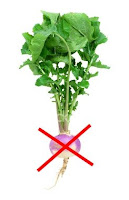
An effective, safe greywater system slowly filters water through the soil so that microbes can devour the organic material in the water. The system should be designed such that people never come in contact with the greywater. The systems can be used to assist food production, provided that the plants are not root crops. Don’t spray grey water on plants (or anything else). The water could contaminate the plant and contaminated water droplets could be inhaled.

As a safety precaution, purple pipes are used in the construction of greywater systems, if possible. This colour standard is to avoid any accidental consumption.

Don’t store greywater. It will fester dangerously. Also, design the system to keep water flowing. Systems that allow stagnation will convert relatively clean waste water into a health hazard.

It is a good idea to design the system with a 3-way diverter valve so that greywater can be either directed into the greywater system or to the sewage system. In cold climates, this feature is a necessity.

Make the system so that water sinks into the ground. Don’t allow greywater systems to flow into lakes or rivers, or you risk (illegally) contaminating them. A good rule of thumb is to keep systems at least 50 feet from open water. Local codes may require more than this. (To be fair to greywater systems, it should be noted that about 20% of sewage systems in the U.S. discharge sewage with only solids removed directly into natural open water; and all systems flush into water systems during heavy rains.)

Greywater systems require a change in behaviour. Harsh household chemical cleansers will have to be substituted for greener alternatives.

Consider the bedrock on the site. On a site with limestone, it is theoretically possible, however unlikely, to contaminate groundwater with a grey water system. Greywater systems are still possible, but the potential danger must be addressed in the design.

Avoid perforated pipes for water distribution. First, they clog with sediments from the greywater. Second, even water distribution from the holes is next to impossible. Third, roots will surely clog the system. Dumping directly into a gravel bed system or mulch pit is much better, is simpler to design, cheaper to build, and cheaper and easier to maintain.

Also avoid grease filters and other filtration systems. They will clog and they will clog quickly. If regular cleaning of messy and potentially toxic filters is a necessity of the system, it is likely that the user will stop using the system.

Greywater Volumes by Source

   Washers 115 to 190 litres per day. Good water quality.
Bath tubs 150 litres per use. Good water quality.
Kitchen sink 20 to 60 litres per person per day. Nutrient rich, but high in grease, soap and solids. Use drain screen.
Shower 40 litres per person per day. Good quality. Use drain screen.
Dishwasher 20 to 40 litres per day. Poor quality due to salt in dishwashing detergent.
Bathroom sinks 4 to 20 litres per person per day. Good quality.

Systems

Perhaps the simplest, cheapest, most reliable, best performing greywater system is the branched drain system emptying to mulch pits or leach fields, created by greywater master designer Art Ludwig. In this system, “double-elbow” pipe fittings are used to spread the flow of greywater to different areas of the garden. The branched drain system allows greywater to split into two paths up to 4 times. In other words, 16 drains to mulch pits or leach fields are possible in one branched system. Valves can be placed on each branch to allow that section’s flow to be cut off. The ideal place to do this is on the level section after each double elbow. This will prevent water from backing up and stagnating in the pipes.

Greywater system
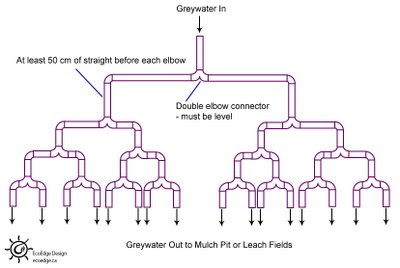
The elbow will effectively halve the flow, but you will need to ensure that the pipe leading up to the elbow has at least 50 cm (about 20”) of straight section. Also, the slope of the pipes should be kept at a fall of 1:48 or steeper to keep the water flowing.

Whether a system is branched or not the ends can be hoses (flexible PVC is advisable as it does not look like a garden hose, thus people are unlikely to drink from it mistakenly), making them movable. This allows different areas to be watered. The advantage here is if one area becomes saturated, it can be shut off.

The “gravity drum” system is ideal for draining washing machines evenly without surges in flow. This system will either have to be branched as above to deliver to a number of sites, or its drainage hose will have to be moved to avoid one location from becoming saturated. Greywater flows from the washing machine’s drainage hose into the top of a 55 gallon plastic drum. At the bottom of the drum, a hole is drilled and a coupling is added to fit a hose to drain the drum as shown. It will be necessary to put a small hole in the top of the barrel, or water will siphon out preventing the machine from refilling (wasting water and making the machine inoperable until the siphon is broken).

Greywater system

Big-brand detergents can be very high in sodium, so it is best to choose a brand that has a low environmental impact. Only in tropical highlands would this extra sodium be beneficial, but only in small amounts. To address the sodium accumulation, it is best to combine the system with rainwater collection from the roof (or other surface as the case may be) to flush out the excess.

Greywater can simply be delivered into a mulch pit by placing the end of the pipe in the mulch. The diagrams below show a slightly more elaborate system that drain into a swale (a water-harvesting ditch on contour).

Greywater system

Leach fields are another simple and safe way to distribute greywater. The diagrams below demonstrate one method to construct a simple leach field. This design delivers simplicity and construction savings at the expense of a somewhat imprecise distribution of greywater.

A trench 1 to 2 meters long and 40 to 50 cm deep is dug and partially filled with gravel or mulch. A hole is cut in the bottom of a clay or plastic flower pot and the greywater hose fitted to it. It is best to push to hose through into the pot and place a coupler on the hose larger in diameter than the hole in the pot. This will prevent the hose from pulling out. Place the pot on the gravel, or if you use mulch, rest the pot on some bricks to keep the pot from sinking into the mulch. Then cover the rest with mulch. The diagram show the tops exposed, but they can be buried in mulch.

Greywater system
Greywater system
Greywater system

Straight greywater cannot be stored for long before it will stagnate and become a smelly health hazard. Once it is treated, however, the water can be held in tanks for later non-potable use. The design below illustrates a simple system using the technique just described to treat water that can be used downstream in the system. The entire unit can be built into a water proofed plywood box or a constructed ferro-cement box.

These leach fields are a convenient solution for cold climates. Outdoor greywater systems need to be shut down in winter as they would freeze up. Leach fields, however, can be incorporated into a greenhouse. Furthermore, any warmth from the use of hot water can be transferred to a greenhouse rather than wasted in the septic or sewage system.

Another option for the treatment of greywater that lends itself well to greenhouses is the constructed wetland. This system is also an option for very wet areas where the ground is too saturated to accept additions of greywater. The water exiting the constructed wetland could be used for irrigation purposes or could go into an aquaculture system. One square foot of wetland surface area will be enough to treat one gallon of water. So, if you produce 50 gallons from one source, you will need 50 square feet of wetland surface area. The fine tuning of these systems can be a bit tricky as nutrient supply determines how many plants can survive. If the system is in a greenhouse, it will be simpler as you do not need to consider the amount of rainfall you can expect to receive. And if the system is too big for the nutrient supply, this can be remedied by controlled additions of actively aerated compost tea.

The diagrams below help to illustrate how a wetland is constructed:

Greywater system
Greywater system
Greywater system
Greywater system

Building Specifics

If your system is to drain outdoors, you will need to check if your soil is capable of handling the load. Dig a 30 cm (12”) deep hole about 10 or 15 cm in diameter. Fill the hole with water 2 or 3 times to saturate the soil. Then place a stake with marks denoting distance (in inches or centimetres) in the hole. Fill the hole with water and time how long it takes for the water to drain down. It will give you the inches or centimetres per minute that the soil is capable of handling.

If you are building a new home, do not mix greywater pipes with blackwater (from the toilet) pipes, including the vents. This makes implementing a greywater system easier. Also, implementation will be easier if you design your greywater pipes to conserve vertical drop as the system will be gravity fed.

Use between 2 inch and 1 ½ inch pipes. Any smaller and clogs are more likely. Any larger and solids might stick on the bottom of the pipe.

Be careful to keep the slope of all the pipes in the system at least 1:48 (1 cm drop over 48 cm, or ¼” drop over one foot) or steeper. And less and you risk clogs forming in the system. Also design the final outlet to empty the water with a fall of several inches. This will prevent solids from backing up at the end of the pipe and clogging.

Map out the system for future maintenance, and be sure to incorporate easily accessible cleanouts.

Filed Under: Article Tagged With: Water

Courses

A Brief Introduction to Permaculture

Design Fundamentals I

Design Fundamentals II

Articles by tag

Getting started

Temperate climate

Tropical climate

Arid climate

Urban permaculture

Design

Earthworks

Energy

Fungi

Home design

Interviews

Land repair

Patterns

Soil

Trees

Water

About TOS Contact Resources
  • Facebook
  • Twitter

Copyright © 2005 - 2025 · EcoEdge Design Ltd.